| |||||||

Floating crates
You've all seen the crates
floating in the water in one of the early Quake2 maps, well this tutorial will show you
how it's done and it aint that hard really :)
1.Firstly create a fairly
large room about 512x512x512 and put in your player start and a few lights.
2.Place a water brush into
your level so it half fills the room (you may want to place a brush under the player start
to stand on so you don't drown whilst your viewing your level :-)
3.Create a 64x64x64 crate and
place it so the top half is about 32units above the water.
4.Associate the crate with a
Func_train and give it these values
"targetname"
"t1" and make sure the "start
on" is ticked.
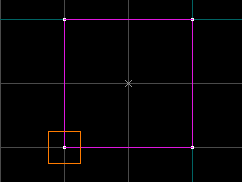
5.Now in the top view of your
editor place a path_corner so it's in the bottom left corner of the crate (see s/shot)
6.Give the path_corner the
following values
"target"
"t2" 7.now create some more
path_corners and make sure the targetnames link to the next corner.
8.now the last corner will
link back to the first corner so give it these values
"target"
"t1" 9.You'll probably want to
work with a small grid size and keep the corners quite cloase together but it'll take you
a few goes to get the affect looking good.
10.Compile your map and check
it out in Quake2.
Here's a sample map showing
the example.
Comments & Questions to
"speed" "5"
"targetname" "t1"
"targetname" "t???"
Quake Workshop