| |||||||

QuakeEd4
We recently handed out the code for Quake2 including the editor. Here's a quick reference for it. Don't email about this--I'm just putting this together to help people get started.
/// Zoid.
Table of Contents
Setting up and Running QE4
The QuakeEd4 Screen
Basic Brush building
Changing Textures and Surface Attributes
Making Entites
Building Rotating Crap
Compiling your map
Key Reference Guide
Setting up and Running QE4
Please note: QuakeEd4 needs a three button mouse. If you have the middle button as assigned as 'double click', you need to turn that off. The middle button is used to pick up texture values from brushes, and is used fairly often.
Download the Q2 Editor and Utility source from:
ftp://ftp.idsoftware.com/idstuff/quake2/source/q2source_12_11.zip
Unzip into your Quake2 directory. It will install stuff in various directories. (Make sure you use a zip with long file name support, and extract subdirectories).
Grab an unpacking tool, I use:
http://www.cdrom.com/pub/quake/utils/bsp_pak_tools/wpak1332.zip
(There's an unpack in Java included with the q2source, but I'm not going to explain how to set up and run Java binaries)
Run WinPack, open quake2\baseq2\pak0.pak and extract all the texture entries (If you have lots of drive space, just extract the entire pak file).
The textures will go into the following directories:
- quake2/baseq2/textures/e1u1
- quake2/baseq2/textures/e1u2
- etc...
Edit the file: quake2\baseq2\scripts\quake.qe4
You need to change the paths to the correct directories. If you were on drive C:, it would
look like this:
	{
	// maps will be loaded and saved from <basepath>/maps
	"basepath"                      "c:\quake2\baseq2"

	// you are using your local machine to bsp, set rshcmd to ""
	// and remotebasebath to the same thing as basepath.
	// if you are using a remote unix host, remotebasepath
	// will usually be different.
	"rshcmd"                        ""
	"remotebasepath"    ""

	// the entity classes are found by parsing through
	// all the files in <entitypath>, looking for
	// /*QUAKED comments
	"entitypath"            "c:\quake2\game\*.c"

	// the "textures" menu is filled with all of the directories
	// found under <texturepath>.  All texture references from maps
	// have <texturepath> implicitly prepended.
	// The textures directory can be duplicated on a local harddrive
	// for better performance.
	"texturepath"           "c:\quake2\baseq2\textures"

	// every five minutes, the editor will autosave a map if it is dirty.
	// this should be on a local drive, so multiple people editing
	// maps don't collide
	"autosave"                      "c:\autosave.map"

	// the "bsp" menu in QuakeEd is filled with the following bsp_* commands
	// when selected, the value string will be expanded then executed in the
	// background.
	// ! will be replaced with <rshcmd>
	// $ will be replaced with <remotebasepath>/maps/<currentmap>
	// @ is changed to a quote(in case you need one in the command line)

	"bsp_Relight_Qrad"  "! qbsp3 -onlyents $ && ! qrad3 $"
	"bsp_novis"             "! qbsp3 $"
	"bsp_Entities"          "! qbsp3 -onlyents $"
	"bsp_FullVis (nowater)"   "! qbsp3 -nowater $ && ! qvis3 $ && ! qrad3 $"
	"bsp_FullVis"           "! qbsp3 $ && ! qvis3 $ && ! qrad3 $"
	"bsp_FullVis (no qrad)"         "! qbsp3 $ && ! qvis3 $"
	"bsp_FullVis (qrad -extra)"   "! qbsp3 $ && ! qvis3 $ && ! qrad3 -extra $"
	"bsp_FullVis (nodetail, qrad -extra)"   "! qbsp3 -nodetail $ && ! qvis3 $ && ! qrad3 -extra $"
	"bsp_FastVis"           "! qbsp3 $ && ! qvis3 -fast $ && ! qrad3 $"
	"bsp_FastVis (nowater)"   "! qbsp3 -nowater $ && ! qvis3 -fast $ && ! qrad3 $"
	}
Now create a shortcut to QuakeEd4 in quake2\bin_net\qe4.exe. Before you run it, make sure you change the properities on the shortcut and set the 'Start In' directory to quake2\baseq2. This is important or QuakeEd4 won't find it's files.
If everything is done right, double click the shortcut and QuakeEd4 should load. If you get errors, something wasn't set up right.
NOTE: Windows 95 users have OpenGL installed with OSR2, but Retail Version users will have to download it. It's buried on Microsoft's Web Site somewhere. NT4 comes with OpenGL.
For hardware GL users: The only cards that I know works with QuakeEd4 are the 3DLabs Permedia2 based cards (such as the Diamond FireGL Pro), GLINT based cards, Intergraph RealiZm cards and usually only under NT. The RIVA cards should work once they get a complete OpenGL ICD for them.
If you are not using hardware GL, you'll be somewhat sad. If you set the texture mode to 'nearest' in the textures menu, it won't be painfully slow, but the textures are drawn a little weird.
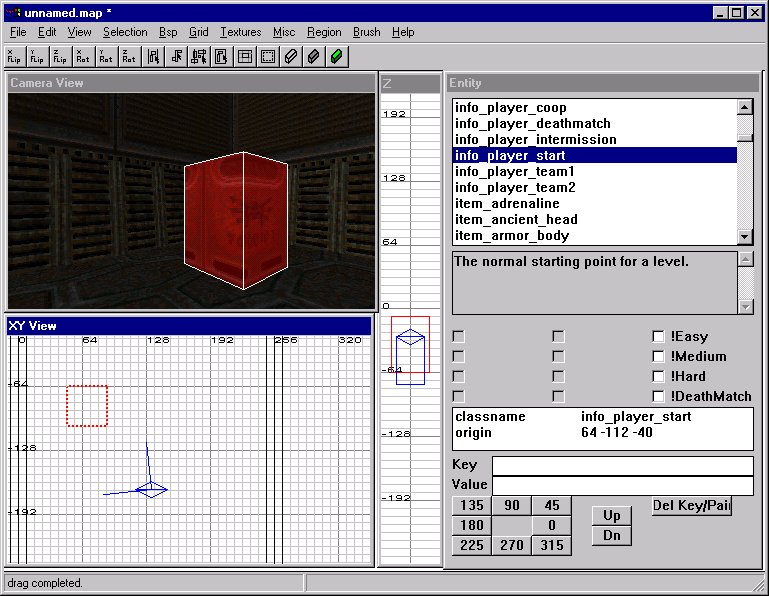
The QuakeEd4 Screen
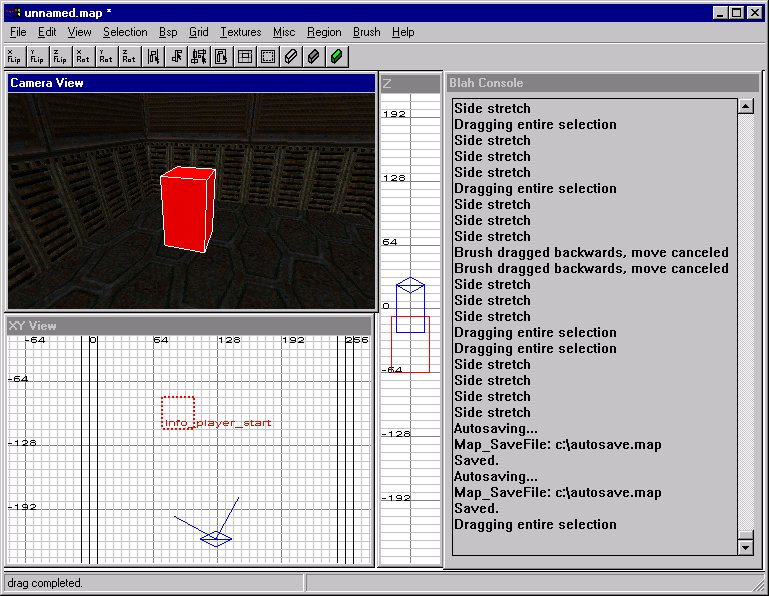
Once you load QuakeEd4 up, you should see four windows, they are:
- Camera (3D View)
- XY View (overhead 2D view)
- Z control (side/height view)
- Console/Enitity/Texture window (this windows shares jobs)
The screen shot above shows a layout for a 800x600 screen.
Basic Brush building
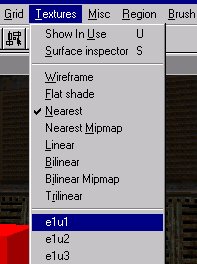 First up, we
need to load a texture set. Select 'e1u1' from the Textures menu. If you extracted the
textures and installed everything correctly, QuakeEd4 should grind away on the disk for a
while and load up the textures.
First up, we
need to load a texture set. Select 'e1u1' from the Textures menu. If you extracted the
textures and installed everything correctly, QuakeEd4 should grind away on the disk for a
while and load up the textures.
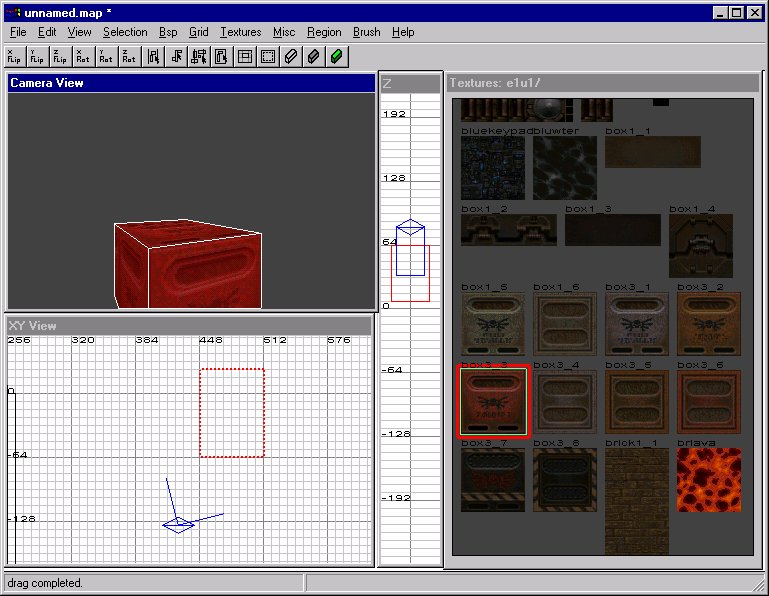
Once it's loaded, you'll see the textures in the
console window (which is now the textures window). You can use the right mouse button to
scroll the textures window (click on the window and drag up/down with the right mouse
button).
Let's make a brush. Left click on a texture in the textures window to pick one. Now moving to the XY window, draw a box (click and drag) with the left button. That will make a brush.
Drawing a Brush
The XY should have two things in the window now--the brush you just created (a square) and a little blue angled thing. The blue angled thing is the camera in the 3D view.
To move the camera, use the right mouse button the 3D view. It works like this:
- imagine a center line in the 3D window, the center is the point of movement
- clicking the right mouse button above the center line moves forward
- clicking the right mouse button below the center line moves backward
- clicking the right mouse button left the center rotates left
- clicking the right mouse button left the center rotates right
By holding the Ctrl button down and using the right button in the 3D window the camera will 'strafe' in the direction you drag with the right button. In strafe mode, there is no center, you will move in the distance you drag while holding down Ctrl and the right mouse button. Holding Ctrl down and using the right button let's you move the camera up and down in the 3D view.
Try and move the camera around so you can see the brush you made earlier in the 3D view. it should be red, since it's selected. ESC (Escape) clears the current selection. Shift Left Click selects brushes in the 3D and XY views.
To recap:
- Creating a brush
- select a texture in the texture window
draw a box by dragging a square in the XY window - Moving the camera
- use the right button in the 3D window
use ctrl+right button to strafe in the 3D window
To resize your brush, select it first (shift left click, works in the 3D and XY windows).
If you place the pointer inside the brush, and left click and drag, you will move it. If you place the pointer _outside_ the brush and left click and drag, you will resize the nearest edge to the pointer.
For example, if you left click to the right of the brush in the XY, moving left and right will stretch the brush on the right side in that direction.
Resizing and moving a brush like this works in all views: 3D, XY and Z. yes, You can do all your editing in the 3D view. Try it! Select a brush in the 3D view, then left click and draw around in the 3D view and move/resize your brush.
If you click the mouse in an area such as the top right corner above the brush, you can resize two sizes at once.
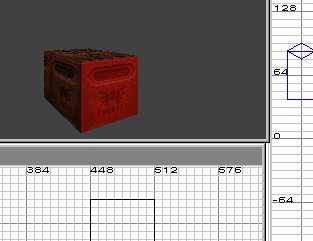
A comment on the Z view
The Z view is special. It's not like the XY view. It only shows height, not the size of the brush. It's used to make the brush taller or shorter. It works much the same as the other views, just it's limited to height.
Changing Textures and Surface Attributes
 Now that you can create brushes, let's
talk about changing the textures on them.
Now that you can create brushes, let's
talk about changing the textures on them.
To change a texture on an entire brush, just select that brush and then left click on a different texture in the texture window.
To change only one face on a brush, use
Ctrl-Shift-Left click on the face you want to change in the 3D view. The single face will
be selected and textures you click in the texture window will only change that face.
Let's talk about surface attributes.
In Quake, the only thing about a face on a brush (also called a suface) is it had a texture on it. You could move the texture around, rotate and scale it.
Quake2 extends this in not only does a surface have a texture, but it can also have other attributes such as light, warp (water flowing), ladder, etc.
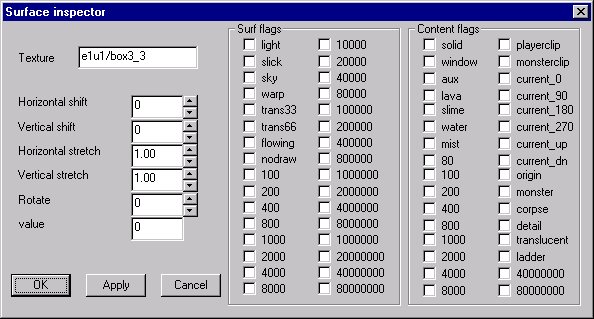
The Surface Dialog
To change the surface attributes on a face, select a face (ctrl-left shift in the 3D view) and hit 'S'. This will bring up the surface attributes dialog. From here you can align a texture, scale it, rotate it, etc. You can also specify the surface attributes.
For example, to make a face emit light (choose a texture such as one of the wall light textures that are yellow or white) select it in the 3D view (shift-left click) hit 'S'. Check on "Light", then enter the amount of light in the "value" box. For example, 500 is a good value.
NOTE
When a surface emits light, the color of the light is based on the color of the surface (!!). So if you use a yellow colored wall light, it will emit light with a yellow hue. A whitish texture will emit white light, etc.
Here's a breakdown on the surface attributes:
| Attribute | What is does |
|---|---|
| light | Emit light from the surface, the amount of light is specified in the 'value' field. |
| slick | Makes surface slippery (use with discretion) |
| sky | This surface is sky, the texture will not be drawn, but the background sky box is used instead |
| warp | The surfaces warps (like water textures do) |
| trans33 | Surface is 33% transparent, for stuff like windows/force fields |
| trans66 | Surface is 66% transparent. This is less transparent than trans33 |
| flowing | The texture wraps in a downward 'flowing' pattern (warp must also be set) |
| nodraw | Used for non-fixed-size brush triggers and clip brushes |
The other flags are unused (such as the numbers). The content flag specifies the contents of a brush. All surfaces on a brush must have the same content field or qbsp will complain.
Content fields:
| Content flag | What is does |
|---|---|
| solid | default for all brushes |
| window | brush is a window (not really used) |
| aux | not used |
| lava | the brush is lava |
| slime | the brush is slime |
| water | the brush is water |
| mist | creates a non-solid brush |
| playerclip | Player can not pass the brush (other things can) |
| monsterclip | monster's can't pass the brush (player and other things can) |
| current_* | Direction of current in the brush (usually water brushes) |
| origin | Special brush used for specifiying origin of rotation for rotating brushes |
| monster | ? |
| corpse | ? |
| detail | This is special, explained below |
| translucent | Use for opaque water that does not block bsp views |
| ladder | Brushes with this content allows a player to move up and down a vertical surface |
NOTE on Detail Brushes
Detail brushes are used when vising a map. For example, say you had a room with a bunch of small ceiling lights that poke out about eight units into the room. These lights do not occlude the view of anything, but will increase the vis time a lot since those small protrusions cause the room to be cut up into sections. By specifying the detail content flag, those brushes are ignored during the vis phase. This greatly speeds up the vis calcuation time. Obviously, you wouldn't use this on a wall or other large structure, since they occlude other parts of the level.
NOTE
The surface dialog always defaults to the last face you changed. So if you select a face, do some stuff ot it, then select a different face, the surface dialog will contain the stuff from the previous face you edited. In order to edit the current face, you have to click the middle button on the face to "pick up" the surface attributes from that face.
Making Entites
Now that we can build brushes and change the surface bits on them, let's talk about making entities.
Creating an Entity
The easiest way to make an entity is this:
- draw a square brush in the place you want the entity to go
- Select the entity view in the console window by hitting 'N'
- choose an entity from the list
- once you have the entity, double click on it. The current selected brush(es) will become that entity. From here you can modify the various fields of the entity, set the angle, etc.
For point entities (such as ammo, player start's, etc), the brush will get changed to the size of the entity.
For world entities (func_door, func_plat, etc.), the brushes will not change but will just 'become' the entity.
I'm not going to explain the entities here, they should be fairly obvious.
Building Rotating Crap
One of the coolest things about Quake2 is building rotating stuff. It's so cool! The amazing thing is, it's really easy.
For example, let's make a little spinning fan.
Draw two brushes, cross over each other like a plus sign.
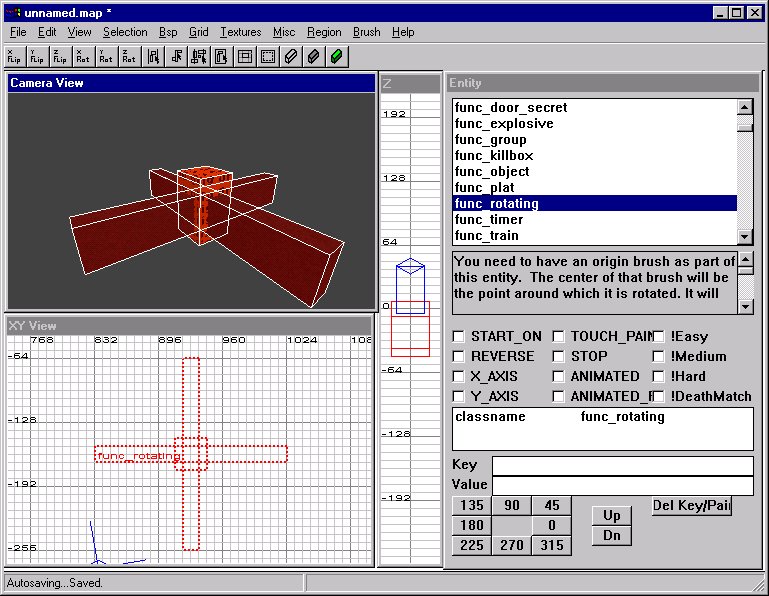
A Rotating Entity
 In the center, draw another brush a
little larger than the middle joint, but make sure the center of the brush is the center
of the cross joint of the two other brushes making the fan.
In the center, draw another brush a
little larger than the middle joint, but make sure the center of the brush is the center
of the cross joint of the two other brushes making the fan.
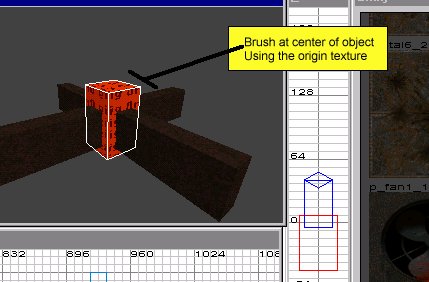
Give this third brush the texture 'e1u1/origin'. If you don't have the origin texture, pick some texture, select the brush, and specify the 'origin' content flag in the surface attributes dialog.
And origin brush is special--it specifies the
center of rotation for the object. Remmber, it's the middle of the origin brush that it
rotates around, not the other brushes themselves!
Select all three brushes now (the two fan pieces and the origin brush), the bring up the entity dialog (hit 'N'). Scroll the list of entities and find func_rotating. Double click it to make your brushes into a func_rotating entity.
You can specify the speed and click START_ON to amek sure the brush starts out rotating.
That's it. You have a rotating fan.
Doors are similiar, just make a door, place an origin brush where the center of the door rotation is (usually to one side, so the door rotates out), then make all the brushes a func_door_rotating. You have to specify a distance key (usually 90 for 90 degrees). If your door goes the wrong way, click on 'REVERSE' or specify a negative distance value.
Origin brushes must be rectangular (a simple block).
Compiling your map
Save your map, then run:
	qbsp3 <map name>
	qvis3 <map name>
	qrad3 <map name>
Omit the extension in the map name (use base1, not base1.map for example).
If you get errors, fix them.
You may need to add quake2\bin_nt to you path. If you don't know what a path is, go look it up.
To run the map in Quake2:
quake2 +map base1
(replace base1 with your map name)
Key Reference Guide
This outlines the mouse buttons and keys in each of the views and keys that work anywhere.
| Global Keys | |
|---|---|
| Key | What it does |
| A | Tilt camera up in the 3D view |
| Z | Tilt camera down in the 3D view |
| N | Change console to entity dialog |
| T | Change console to texture view |
| S | Bring up surface attribute dialog (must have a brush face or a brush selected, which causes the dialog to affect all faces on selected brush) |
| 1 | Change grid to one unit |
| 2 | Change grid to two units |
| 3 | Change grid to four units |
| 4 | Change grid to eight units |
| 5 | Change grid to sixteen units |
| 6 | Change grid to thirty-two units |
| 7 | Change grid to sixty-four units |
| ESCAPE | Clear current selection |
| BkSp | Delete current selection |
| O | Change to console dialog |
| End | Center camera |
| Insert | Zoom Out in XY view |
| Delete | Zoom In in XY view |
| Ctrl-Insert | Zoom Out in Z view |
| Ctrl-Delete | Zoom In in Z view |
| Ctrl-D | Toggle display of detail brushes in 3D view |
| E | Enter Edge manlipuation mode (drag edges) |
| V | Enter Vertex manlipuation mode (drag vertices) |
| Space | Clone (duplicate) currently select brushes (VERY HANDY!) |
| Ctrl-K | Connect Entities. Must have two entites selected, the first one will be targeted at the second one. (target and targetname entity fields). |
| Ctrl-M | Make select brushes have the detail content flag |
Mouse Control
| 3D View | |
|---|---|
| Button | What it does |
| Left | Moves or resizes selected brushes depending on if pointer is inside or outside the brush |
| Ctrl-Left | Only moves the closest face, but leaves rest of brush alone. This is called 'skewing'. Allows you to easily skew one side of the brush from the others. |
| Shift-Left | Select/deselect brushes |
| Ctrl-Shift-Left | Select/deselect a single brush face |
| Middle | Change current texture and surface attributes to texture under mouse pointer. If a brush is selected, all faces on that brush will be changed to the texture under the pointer. |
| Right | Move camera |
| Ctrl-Right | Strafe camera |
| XY View | |
|---|---|
| Button | What it does |
| Left | Moves or resizes selected brushes depending on if pointer is inside or outside the brush |
| Ctrl-Left | Only moves the closest face, but leaves rest of brush alone. This is called 'skewing'. Allows you to easily skew one side of the brush from the others. |
| Shift-Left | Select/deselect brushes |
| Middle | Point camera at mouse pointer |
| Shift-Middle | Move Z window position to pointer (changes the brushes in the Z view to match) |
| Ctrl-Middle | Move camera to mouse pointer |
| Right | Drag XY view around |
| Z View | |
|---|---|
| Button | What it does |
| Left | Moves or resizes selected brushes depending on if pointer is inside or outside the brush |
| Ctrl-Left | Only moves the closest face, but leaves rest of brush alone. This is called 'skewing'. Allows you to easily skew one side of the brush from the others. |
| Shift-Left | Select/deselect brushes |
| Ctrl-Middle | Move camera to mouse pointer |
| Right | Drag Z view up/down |
That should cover a basic intro into using QuakeEd4. I hope this answers a lot of the general questions.
Please don't mail me. It's an unsupported product and this should outline most of your usage of it.
Thanks to Paul Jaquays for clearing up some of the content flags.
/// Zoid
zoid@idsoftware.com